Cómo crear un brazo cortado en Photoshop
En este tutorial vamos a aprender a crear un brazo cortado con troncos carnosos y cuerdas de tendones. Esto se creó con algunos pinceles básicos y máscaras de capa. Vamos a empezar!
Tutorial Details Tutorial de Datos
- Programa - Photoshop CS3
- Grado de dificultad - Intermedio
- Tiempo para completar 1 hora

Step 1 Paso 1
We will be using two different stock items for this project - first, the arm from cobweb-stock (use "Arm08.jpg" from the zip file) and a lump of meat from stock xchng. Vamos a utilizar dos temas de valores diferentes para este proyecto - en primer lugar, el brazo de la telaraña de valores (uso "Arm08.jpg" en el archivo zip) y un trozo de carne de xchng acciones. Please remember to follow these artists rules and credit them where appropriate. Por favor, no olvide seguir estas normas de artistas y de crédito en caso necesario.
We start by opening the arm picture in Photoshop and duplicating the "Background" Layer by clicking Command + J. We want to preserve the background layer for later on. Comenzamos por abrir la foto del brazo en Photoshop y duplicar el fondo a "capa pulsando Comando + J. Queremos preservar la capa de fondo para más adelante. Hold the Alt key + double-click the duplicate layer, then rename it "Arm." Mantenga presionada la tecla Alt + doble clic en la capa duplicada, a continuación, cambie el nombre "brazo".
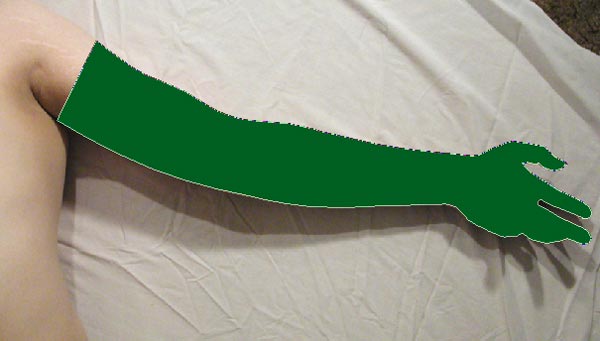
Choose the Pen Tool (set to Shape Layer) to cut out the arm from its background. Elija la herramienta de la pluma (se establece en una capa de forma) para cortar el brazo de su fondo. Its important to have a clean cut, so first zoom into the picture using the Magnifying Glass and carefully trace around the edge cutting across the top of the arm, as in the picture below. Su importante contar con un corte limpio, así que primero zoom en la imagen con la lupa y atención de seguimiento en torno a la vanguardia en la parte superior del brazo, como en la imagen siguiente. If you set the Fill in the Layer Palette to a 0% you will be able to see the arm, but still manipulate the path. Si se establece el relleno en la paleta de capas del 0%, podrá ver el brazo, pero aún manipular la ruta.
Step 2 Paso 2
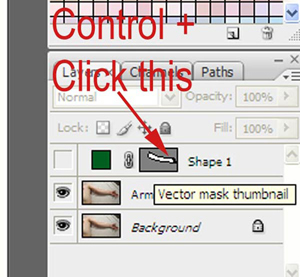
Once you have completed your path and you are happy with it, click the Eye Icon in the Layer Palette next to the Shape Layer to hide it. Una vez que haya completado su camino y que está feliz con él, haga clic en el icono del ojo en la paleta de capas al lado de la Capa de forma de ocultarlo. Follow this by holding Command + Clicking the Shape Layer. Siga este mediante la celebración de Comando + clic la capa de forma. This puts a Selection around the "Arm" Layer, now press Command + J on the keyboard to create a copy of the arm onto a new Layer, rename this Layer "Arm Prime" and hide it by clicking the Eye Icon. Esto supone una selección alrededor de el "brazo" Capa, ahora pulsa Comando + J en el teclado para crear una copia del brazo en una nueva capa, cambiar el nombre de esta capa de "Primer Brazo" y ocultar haciendo clic en el icono del ojo.

Step 3 Paso 3
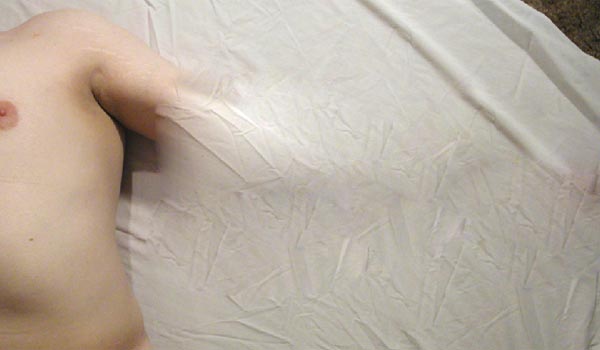
We are now going to remove the arm and shadow from the "Arm" Layer. Ahora vamos a quitar el brazo y la sombra del brazo de la "capa. Choose the Heal Tool from the Toolbox with mode set to normal in the options bar. Elija la herramienta de curar de la caja de herramientas con el modo de establecer la normalidad en la barra de opciones. Sample some of the sheet around the arm by Holding Alt + Clicking the sheet. Ejemplo de algunas de las hojas alrededor del brazo por Holding Alt + clic en el hoja. Luckily the sheet is quite creased so making it look convincing will be easy. Afortunadamente, la hoja es muy arrugada para hacer que parezca convincente será fácil.
Start painting over the arm and resample different parts of the sheet to keep the texture from repeating. Empiece a pintar sobre el brazo y volver a muestrear diferentes partes de la hoja para mantener la textura de repetir. Activate "Arm Prime" from time to time to make sure you don't go to far up the arm. Activar "Brazo Primer" de vez en cuando para asegurarse de que no van a la medida hasta el brazo. Eventually the arm and shadow will be removed leaving you with a stump and a clean sheet as in the picture below. Finalmente, el brazo y la sombra se eliminará la deja con un tronco y una hoja como en la imagen siguiente.
Step 4 Paso 4
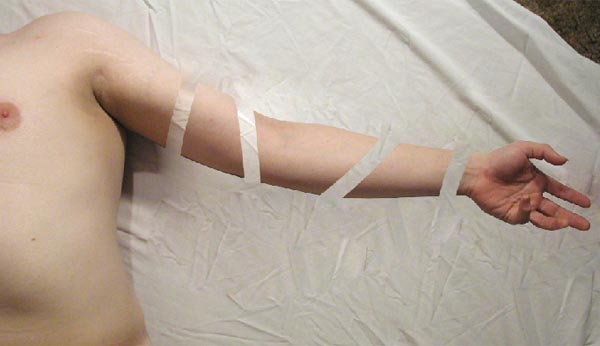
Reactivate the "Arm Prime" layer by pressing the Eye Icon next to it in the Layer Palette. Vuelva a activar el "brazo primer" capa pulsando el icono de ojo situado junto a ella en la paleta de capas. Next we want to add a Layer Mask (Layer > Layer Mask > Reveal All) to this Layer so we can mask out some of the arm. A continuación queremos añadir una máscara de capa (Capa> máscara de capa> Descubrir todas) a esta capa, así que puede ocultar algunos de los brazos. Choose a Hard Edged brush from the Brush Picker setting the size to 80 pixels, Opacity of 100% and Flow of 100%. Elija un cepillo duro filo del Selector de pinceles establecer un tamaño de 80 píxeles, la opacidad de 100% y el flujo de 100%. Next set your Foreground color to black (#000000) and on the Layer Mask draw four cutting lines as in the picture below. Siguiente configurar el color frontal en negro (# 000000) y en la máscara de capa sacar cuatro líneas de corte como en la imagen siguiente.
Step 5 Paso 5
Save your progress and open the meat texture file that we downloaded earlier. Guarde su progreso y abrir la textura de la carne de archivo que hemos descargado antes. Once again cut it out from its background. Una vez más, ya basta de su fondo. You don't need to be as careful with this as we want to rough it up a bit soon anyway. Usted no necesita ser tan cuidadoso con esto, ya que queremos en bruto que un poco pronto de todos modos. Use your Pen Tool as before to trace around the edge - be careful not to select the shadow. Utilizar su pluma de herramientas que antes para trazar el contorno - tener cuidado de no seleccionar la sombra.
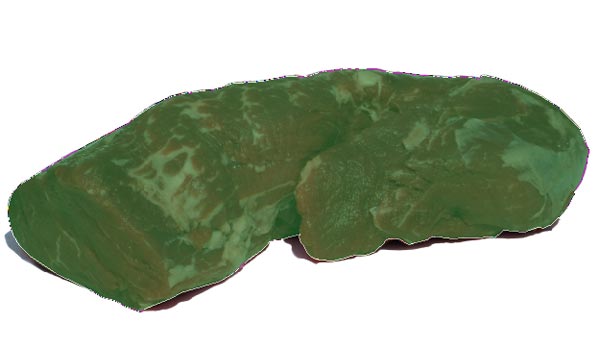
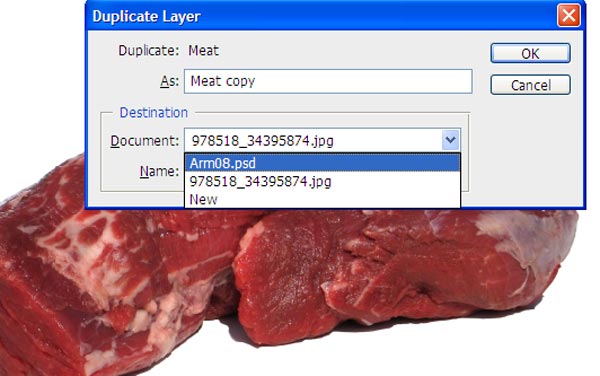
As in Step 2 copy this to a new Layer by pressing Command + J, and rename this layer "Meat." Como en el paso 2 copiar este a una nueva capa pulsando Control + J, y cambiar el nombre de esta capa de "carne". We now want to copy it to the working document, we do this by holding the Alt key and dragging the "Meat" layer to the "Create a New Layer" Icon within the Layer Palette . Ahora queremos copiarlo en el documento de trabajo, esto lo hacemos manteniendo pulsada la tecla Alt y arrastrando la "carne" de capa a la "Crear una nueva capa de" icono de la paleta de capas. This will open a dialog asking you what document you want to copy it too. Esto abrirá un cuadro de diálogo que le pregunta qué documento que desea copiar también. Choose "Arm08" (which is our working document) from the list, and Click OK. Seleccione "Arm08" (que es nuestro documento de trabajo) de la lista, y haga clic en Aceptar. Finally, go back to the "Arm08" document. Por último, volver a la "Arm08" documento.
Step 6 Paso 6
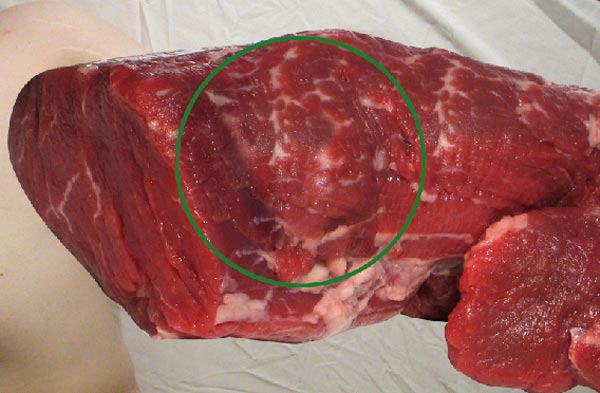
Move the "Meat" layer to the top of the Layer Stack. Mover la "carne" de capa a la parte superior de la pila de capas. Use the Healing Brush to remove some of the larger white patches of fat on top of the meat with other sampled texture. Utilice el pincel corrector para eliminar algunas de las manchas blancas más grandes de grasa en la parte superior de la carne con la textura muestra otra. If you don't have the Healing Brush then feel free to use the Clone Stamp. Si usted no tiene el pincel corrector continuación, siéntase libre de usar el Tampón de clonar. Position the Meat Layer so it totally covers the arm and hand, move the Meat Layer below the "Arm Prime" Layer. Posición de la capa de carne por lo que cubre totalmente el brazo y la mano, mover la capa de carne por debajo del brazo el "primer" de capa.
Step 7 Paso 7
We are now going to draw the flesh back onto the arm stumps, we begin by adding a Hide All Layer Mask to the "Meat Layer" (Layer > Layer Mask > Hide All). Ahora vamos a sacar la carne de nuevo en el brazo de tocones, comenzamos añadiendo una capa Ocultar Todos Máscara a la "Carne Layer (Capa> máscara de capa> Ocultar todas). Next we want to choose a Soft Edge Brush from the Brush Picker with a size of around 10-20 pixels, Opacity 100% and Flow 100%, the settings then need to be adjusted. A continuación queremos elegir un cepillo suave borde del Selector de pinceles con un tamaño de alrededor de 10-20 píxeles, Opacidad 100% y el flujo del 100%, entonces los ajustes que haya que ajustar.
Press F5 or go to Window > Brushes to open the Brush dialog window. Presione la tecla F5 o ir a Ventana> Pinceles para abrir la ventana de diálogo de Brush. If you are using a pressure sensitive tablet then, your first stop is the Shape Dynamics, under Size Jitter locate the Command Drop Down List and select Pen Pressure. Si está utilizando una tableta sensible a la presión entonces, su primera parada es la Dinámica de Forma, en Tamaño de Jitter localizar la lista desplegable de comandos de Down y seleccione Presión de la pluma.
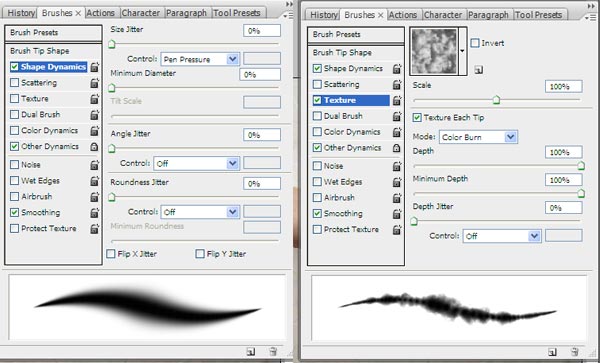
We then want to change the Texture of the Brush to give it a nice rough look, choose Clouds from the provided list of textures, with Scale 100% also tick Texture Each Tip. A continuación, desea cambiar la textura del pincel para darle un aspecto áspero agradable, nubes elegir de la lista proporcionada de texturas, con escala de 100%, ponga una cruz Textura cada punta.

Step 8 Paso 8
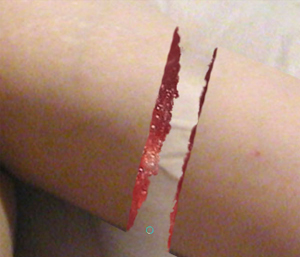
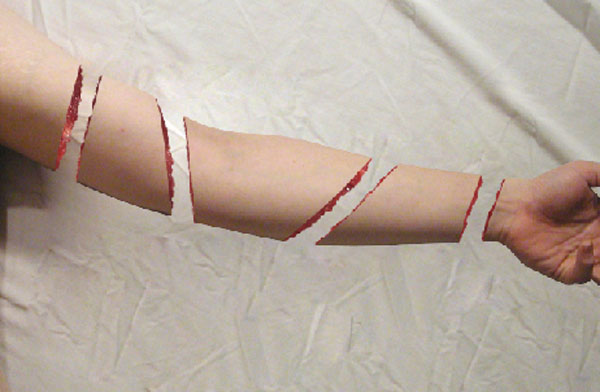
We are now ready to paint the meat back on, Select the Meat Layer's Mask and with the Brush's Foreground Color set to White (#FFFFFF) gradually build up the arm as in the picture below. Ahora estamos listos para pintar la carne de nuevo, seleccione la capa de máscara de carne y conocimientos adquiridos con el Pincel de color a blanco (# FFFFFF) desarrollar gradualmente el brazo como en la imagen siguiente. Repeat this for each section of arm. Repita esto para cada sección del brazo.
Step 9 Paso 9
The shadow of the arm is used to ground the image and make it look less fake. La sombra del brazo de tierra se utiliza para la imagen y hacer que se vea menos falso. We use the shadow from the original photo we preserved as the background layer. Usamos la sombra de la foto original se conserva como la capa de fondo. Locate the "Arm" Layer and Add as Reveal all Layer Mask (Layer > Layer Mask > Reveal all). Busque el "brazo" de capa y como se revela en todos Añadir máscara de capa (Capa> máscara de capa> Mostrar todos).
We will now mask out some of the "Arm" layer revealing the shadow below, try and follow the shape of the arm. Ahora vamos a enmascarar algunos de los brazos de la "capa" que revela la sombra a continuación, tratar de seguir la forma del brazo. Once again we will be using a Soft edge brush, or you can continue to use the textured brush we created in the last step if you wish. Una vez más vamos a utilizar un cepillo de borde suave, o puede seguir utilizando el cepillo de textura que hemos creado en el último paso si lo desea. This will add a rough edge to your shadow especially around the stumps. Esto añade un borde áspero de su sombra sobre todo alrededor de los tocones.

Step 10 Paso 10
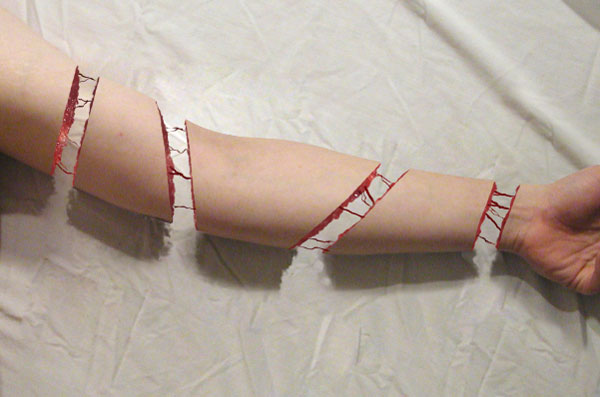
The project is almost complete. El proyecto está casi completa. The final steps are to draw some veins and strings of flesh onto the stumps and make some shadows. Los pasos finales son para extraer algunas venas y las cadenas de la carne en los tocones y hacer algunas sombras. We shall reuse the "Meat" layer for this step. Vamos a volver a utilizar la "Carne" capa para este paso.
First we need to copy this layer, either press Command + J or drag it to the new Layer Icon within the Layer Palette. Primero tenemos que copiar esta capa, o bien pulsar Comando + J, o arrastrarlo al icono de nueva capa en la paleta de capas. The new layer will be called "Meat Copy." La nueva capa se llamará "Carne Copiar". Drag this above the "Arm Prime" layer and delete its Layer Mask by right-clicking on the Mask and selecting Delete Layer Mask. Arrastra este por encima de la "Brazo de la capa de Prime" y eliminar su máscara de capa haciendo clic derecho sobre la máscara y seleccionando Eliminar máscara de capa. Once again the whole slab of meat should be visible. Una vez más, la losa toda la carne debe ser visible.
The meat needs to be a little darker for the strings - so we adjust it with Levels (Image > Adjustments > Levels) setting the Input Levels to 0, 0.64, and 255. La carne tiene que ser un poco más oscuro para las cadenas - así que ajustarla con Levels (Imagen> Ajustes> Niveles) el establecimiento de los niveles de entrada a 0, 0,64, y 255. We are then going to add another Hide All Layer Mask to this Layer (Layer > Layer Mask > Hide All>). Estamos entonces va a agregar otra capa Ocultar Todos Máscara a esta capa (Capa> máscara de capa> Ocultar todas>).
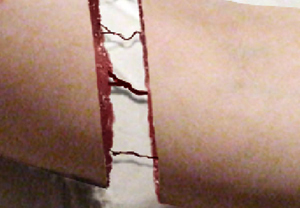
Choose the Brush Tool again, the textured brush should still be active. Elija la herramienta de pincel, el pincel de textura aún debe ser activa. If not, then set it again as in Step 7, adjust the size so it is very small around 4 or 5 pixels. Si no, a continuación, establezca de nuevo como en el paso 7, ajustar el tamaño de lo que es muy pequeña alrededor de 4 o 5 píxeles. On the Layer Mask draw some strings of flesh joining the stumps together. En la máscara de capa sacar algunas cadenas de la carne que une los tocones juntos. Draw it from flesh to flesh - not skin to flesh. Sacarla de cuerpo a cuerpo - no de la piel a la carne.
Step 11 Paso 11
The strings of flesh will cast shadows down onto the cloth beneath, we can easily fake this by choosing the "Meat Copy" layer Mask and holding Command while Clicking it. Las cadenas de la carne se proyectan sombras sobre la tela por debajo, podemos fácilmente falsos esto escogiendo la "carne de copia" máscara de capa y explotación Comando mientras hace clic en él. This will put a selection around the strings. Esto pondrá una selección alrededor de las cuerdas.
Next we make a new Layer called "Shadow" and fill the selection with black (Edit > Fill > Black). Siguiente hacemos una nueva capa llamada "Sombra" y rellena la selección con negro (Edición> Rellenar> Negro). Using the Move Tool adjust the shadow slightly so it is away from the strings. Uso de la herramienta Mover ajustar la sombra de lo que es un poco lejos de las cuerdas. The black will be too dark so we reduce the Opacity to around 50%. El negro será muy oscuro por lo que reducir la opacidad alrededor de 50%. You can also add a 2 pixel Gaussian Blur if you feel it is still too sharp. También puede agregar un Desenfoque gaussiano 2 píxeles si usted cree que todavía es demasiado agudo. Finally, drag it below the "Meat" layer. Por último, arrástrelo a continuación la "carne" de la capa.
Step 12 Paso 12
Choose the Burn Tool from the Toolbox and set the Range to Midtones. Elija la herramienta de grabación de la caja de herramientas y configure el alcance de medios tonos. Next set the Exposure to 20% and click the Airbrush option. Siguiente ajustar la exposición y el 20% y haga clic en la opción aerógrafo. Select the "Meat" layer and add some dark edges where the meat is exposed. Seleccione la "carne" capa y añadir bordes oscuros donde se expone la carne. Select "Arm Prime" and change the range to shadows, then burn the flesh where the arm has been severed. Seleccione "Brazo Primer" y cambiar el rango de sombras, para luego quemar la carne en el brazo ha sido cortada.

Conclusion Conclusión
The final and probably the easiest step is to create a Black And White Adjustment Layer at the top of the layer stack and change the Blending Mode to Soft Light. El último y probablemente el paso más sencillo es crear en Blanco y Negro capa de ajuste en la parte superior de la pila de capas y cambiar el Modo de fusión a luz suave. This makes the picture darker and more washed out. Esto hace que la imagen más oscura y más lavado. If you don't have the Black and White Adjustment Layer option, then create a Hue/Saturation Adjustment Layer and reduce the Saturation to -100. Si usted no tiene el Blanco y Negro opción de ajuste de capa, a continuación, crear un Tono / Saturación capa de ajuste y reducir la saturación a -100.
Have fun cutting up your own meaty images. Diviértete cortar sus imágenes carne propia. The final image is below. La imagen final es de abajo.

0 comentarios:
Publicar un comentario